
This is the most comprehensive guide to lower back stretches on the planet.
I am going to show you which stretches are working for lower back pain right now (in 2019).
If you want to relieve lower back pain, you’ll love this guide.
Let’s jump right in.
Chapter 1: Read this first – Don’t do any lower back stretches until you read this!
I’ve been there and done that so you don’t have to.
Here’s what I learned:
- Everything I was doing from WebMD to Livestrong was wrong and made my condition worse.
- It wasn’t Piriformis Syndrome – It seems like every other guide out there diagnoses you with Piriformis syndrome
- What’s important is that you don’t make the wrong diagnosis.
What I wish I had known
It started with a long drive, sound familiar?

When I started feeling pain in my right buttock after a road trip, I thought that I probably needed to stretch it out because of the long ride in the car. I looked up lower back stretches and tried to do what made me feel better.
These were the lower back stretches I tried:
- thread the needle – this is ok
- bending over to touch my toes – very bad, don’t do this!
- pulling down into a squat position – bad if you have any disc bulges or herniations
- pulling my knee to the opposite side of my chest – this is ok
I felt some immediate relief but there was still a deeper ache/tension that kept getting worse.
Here’s what I was trying to do to treat it before the diagnosis:
- Walking – this is ok but depends on how bad a herniation is, it could make it worse
- Running – very bad, sprinting is even worse
- Gym
- Leg curls – ok
- Hamstring stretch – ok but don’t curve back when doing so
- Calf raises – seated, not standing is ok
- Belt Squats – depending on size of herniation/bulge this could be ok, not recommended if you have pain
- Foam roller – this didn’t help
- Theracane massage – this felt a little better but didn’t necessarily help much
- Lacrosse ball massage at lower spine and glutes – same idea as the Theracane
- Bodyweight squats – didn’t help or feel good, possibly worsened
- Sleeping with my knees up – the only position that I could sleep without the pain waking me up all night
It only took a couple of weeks to go from bad to worse.
I thought that walking around the zoo with my family while pushing/holding myself up with a stroller would be a good idea since everywhere on the internet says that lower back pain means you need to walk and get out and move. My doctors thought the same, however on this particular outing, I started feeling numbness in my foot. It kept getting worse and worse as we headed straight back to the car.
The next morning I went in to the ER unable to deal with the pain (800mg Ibuprofen wasn’t touching it). I was diagnosed with a bulging disc between L4-L5 and a herniated disc at L5-S1. They sent me on my way with some opioids and a muscle relaxer.
*side note* everyone I’ve spoken to on Flexeril (muscle relaxer) has had their vision go blurry. I stopped taking it and mine finally returned to normal after 3 weeks!

TL;DR
Don’t do any stretches until you’ve correctly diagnosed your issue. I will help you in the following steps to diagnose and treat the issue. Regardless of what you’ve learned or what anyone says, don’t do any stretches that bend your spine (like touching your toes).
Long story short,if you have back pain, it’s probably related to a disc.
Chapter 2: The underlying issue – What’s the cause of your lower back pain?
Nerves and Neuropathy
The spine is very strong but also very delicate. It needs to be maintained properly in order to continue functioning just like anything else in this world. Since the nerves are all connected to your brain, they have to pass through your spine at some point. One of the larger nerves that travels all the way down to your feet is the Sciatic Nerve, hence sciatica or sciatic nerve pain.
If you have neuropathy or pain that travels down a nerve then your symptoms are very likely related to a disc.
You can judge the severity of the bulge or herniation by how far the pain is traveling. If it is in your buttocks, stop whatever you’re doing immediately and start changing your daily routine. You still have hope of healing without additional medical treatment. If your pain has travelled past the buttocks and you feel it in your knee or calf or foot or toes, you’re going to need some extra help to deal with the pain and speed up the healing process. You’ll still need to use the stretches and exercises but on top of that you’ll need to check out the advanced lower back treatment chapter.
Piriformis

The sciatic nerve passes under/through the Piriformis (which is why so many people blame the Piriformis for sciatic pain) on its way down to your foot. The Piriformis is a gluteal muscle under the Gluteus Maximus and connects the spine/sacrum to the top of the femur or leg bone. You can feel it by touching your hips and then moving your hands down until you feel a hard bulge (the femur – ball and socket joint). If you press along the back of the top of that bone you’ll feel part of the Piriformis.
Spinal Stenosis

Although the Piriformis gets a lot of heat because the sciatic nerve is either under it or through it in some cases, there’s another condition that causes even a slight bulge in a disc to put pressure on your nerves: spinal stenosis.
Spinal stenosis is the narrowing of space in your spinal canal, where your nerves pass through. With less space, it doesn’t take much to cause you pain. It’s typically genetic so if you’ve heard the term in your family, you might want to get an MRI to have yourself checked out.
Disc Degeneration

Unfortunately our discs can wear out.
Many doctors and researchers say that they don’t know why some people have degenerative disc disease but I believe it comes down to simple mechanics (from personal experience).
Your discs are basically a fiber mesh (annulus fibrosus) with a jelly filling (nucleus pulposus) inside. To top things off, your nerves are sensitive to this jelly filling and can get really irritated and inflamed if any of it leaks out.
So you have a very complex situation where any wrong turn is going to cause you pain…
Here’s what I’ve found can set set off the chain reaction:
Posture
You know you’re supposed to have good posture but what’s funny is no one every really teaches you how. This is partly due to the media changing and embracing a degeneration of posture starting in the 1920s and partly due to degeneration of posture in society (think of Great Gatsby and the rounded, hunched shoulders popular with the flappers).

We currently have lost good posture which used to be learned from our ancestors.

Bad posture puts strain on your discs which can cause them to weaken over time.

Diet
Diet is often overlooked as a factor that plays a large part in your body’s ability to handle damage and pain. In today’s society, the medical industry is finally turning their attention back to the importance of our diet in relation to injury, healing, cancer and autoimmune diseases. With the discovery of the link between gut bacteria and the brain, we’ve started to look more closely at how what we eat affects us.
A diet that is high in sugar and simple carbs will have an adverse effect on your body as it increases inflammation. Many have adopted a lifestyle diet to reduce inflammation and maintain immune system health.
Diet has had an incredible effect on my body’s ability to heal and reduce the pain that I was feeling. There’s more information below about cleansing your body and building up your immune system.

Weight

Carrying extra weight (on your body or in the gym) alone isn’t enough to damage your discs, they can really take a beating but what typically happens is that it becomes the catalyst for a weakened disc.
In my case, computer/desk job posture coupled with heavy squats, deadlifts, etc. was enough to blow out my discs.
Leaning forward at the computer puts pressure on your discs over long periods of time causing them to weaken. It’s important to keep your spine stacked evenly like a pile of coins.

So although the answer would be simple: live like our ancestors, be more active, don’t have bad posture or slump over your desk.. we are currently living in a reality where we depend on computers, chairs, desks, etc. to survive/hunt for our food. This means we need to work even harder to overcome weight gain.
Embracing a lifestyle that combines a healthy diet (cleanse or inflammation reduction) with proper exercise will give you more energy, allow your body to heal more quickly and undo the effects of ageing.
Chapter 3: Lower Back Stretches to avoid – Why we have lower back pain
“Do your stretches”
That’s why you’re here isn’t it? We’ve been taught that flexibility is the key to health.
“Do Yoga, Pilates, go for a walk etc.”
This has been our health motto since the millennium.
The issue is that we are still living with pain which is not only wrong but is a serious indicator that we need to change.
“If you have pain, you need to make a change”
After studying Ester Gokhale’s method, it’s apparent that pain really only exists in our modern culture. That’s right, we’ve evolved to a place where pain has been added into our daily lives and we’re expected to live with it on a daily basis.
The solution presented to us and proliferated through public schools has been to stretch. We started with bending over and touching our toes.
Don’t touch your toes!
I know, pretty harsh for something we’ve been taught since grade school but if you don’t want back pain, stay away from touching your toes, it’s not a good indicator of flexibility and doesn’t stretch the hamstrings properly.
This is what put my relatively mild case of sciatica into a full-blown, unable to walk herniated disc.
Lower Back Stretches & Movements To AVOID
- Bending the spine – whether its sitting, standing, stretching, etc. this is the number one thing to avoid
Instead: keep your spine straight and avoid movements which compromise this position (i.e. bend at the waist or hinge from the hips to pick something up. If you’re not flexible enough yet, combine waist-bend and squat without curving your back to pick things up).
- Slouching – allowing the shoulders to roll forward
Instead: keep your shoulders back, get a trainer/posture corrector if necessary but make sure your shoulders are back and your chest is out and up. You’ll notice that your neck is straighter up and down and your head is over your hips.
- Craning the neck – moving your head/neck forward
Instead: keep your head back over your hips. Pull up gently on your head (from the base of the skull and under the jaw) with both hands to elongate the neck and set a proper position.
- Rapid twisting – tennis and golf might have to wait for a season
Instead: Do slow twisting and hold stretches without curving the spine.
- Bending and twisting together (typically results in a herniated disc – think of poor golf posture) – this is literally squishing a disc and then grinding it with rotation kind of like wringing out a washcloth
Instead: Keep the back flat and straight (use a brace if necessary) – maintain disc integrity by keeping the the vertebrae parallel to one another and not putting pressure on one side by bending or curving
- Laying flat
Instead: Place pillows under the knees or between the knees when on your side. Focus on posture again (I sleep on my side with a pillow between my legs). More exercises below on this.
- Using lumbar support
Instead: Keep your shoulders back and engage your core. Lumbar support cushions relieve tension in your core which allows the cushion to do all of the lifting. Although there is a reduced amount of compression on your spine when using back support you will eventually weaken your core and cause more harm in the future. Use your core muscles (under your ribs and laterally on either side of your abdomen) to sit upright and maintain good form.
- Sitting up after laying flat (i.e. getting out of bed) or doing a sit-up to get up
Instead: Turn onto your side and push up with your hands.
- Sit-ups and other rectus abdominis exercises (that bend the spine)
Instead: Hanging leg raises/knee raises and other movements that allow you to maintain a straight spine with your lower back pushed against the floor rather than arched.
- Squatting to create flexion (bending forward with the lower back curved) – this might feel good in the short-term but can increase herniation and bulge by exerting pressure on the disc
Instead: Lay on your back and pull your knees up to your chest and hold for a few seconds.
- Anything that causes you to squeeze hard or hold your breath from exertion (heavy weight lifts, bearing down or exerting pressure)
Instead: If weightlifting, use less weight and do the lift very slowly. This will engage more muscle tension for longer and help gains in size and strength overall. Patience wins. Ignore the urge to lift heavier and faster, count to 20 on each rep (10 seconds pushing, 10 seconds on the negative)
- Loading the spine – any overhead lifting or carrying weights with the upper body
- Arnold Press
- Military Press
- Carrying dumbbells to and from a lift
- Loading plates on a barbell
- Carrying children
- Lifting groceries
Instead: Get someone else to lift them for you (spotter, spouse, employee, trainer, etc.) and use other exercises to target the same muscle groups without lifting free weights.
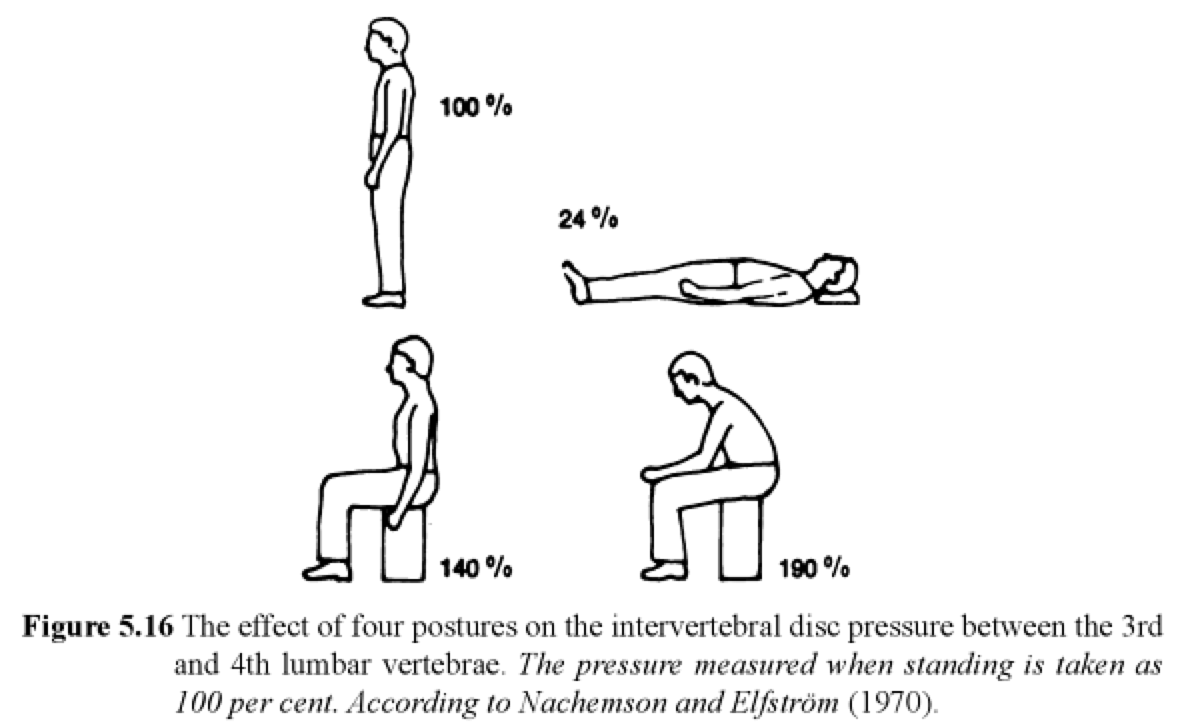
- Sitting for long periods
Instead: Stand – standing reduces compression and pressure on your spinal discs by over 40% – 90%. Lay down – reduces compression 76% more than standing.
- Leaning forward while sitting (not sitting up straight/curving the spine forward)
Instead: Sit up straight – reduces compression 50% over poor posture.
Discs take time to heal (6 months to 2 years) so it’s not that you can’t do ANY of these things ever again but take it easy and allow yourself to heal. I’ve learned some workarounds for most of these limitations which I’ll share with you in the following chapter.
Chapter 4: All The Lower Back Stretches You’ll Ever Need (with images) for healing and pain relief
Let’s get started! The 10 Fundamental Stretches
Before beginning, a word of caution: static stretching (holding a stretch) can cause damage to muscles and tendons if you are not warmed up. Since it’s hard to warm up with back pain, I recommend dynamic stretching (slow, controlled movements that warm and stretch the muscles at the same time).
I’ve done both the research and testing (on myself) to show you which stretches work. This is based on Chiropractics, Physical Therapy & HEP2GO.com and literature from Esther Gokhale, Pete Egoscue, Robin McKenzie and more. Each of their methods have had tings that have both helped me and hurt me and I am only listing what helped me.
Repeat all of these exercises twice daily.
1. Half Kneel Hip/Psoas Stretch

- Start like you’re going to do a lunge and place your back knee on the ground. Use a chair, block or bed to stabilise yourself on the side opposite the front leg (if your left leg is forward, use a stabiliser on the right side)
- Lean forward and try to keep your back up straight (perpendicular to the floor). If you can’t straighten your back because of pain then don’t force it, just do the stretch and focus on the back leg
Tip: You’ll feel the stretch from your back knee through your groin.
Hold Time: Lean into the stretch for about 10 seconds
Reps: Repeat 3 times and then switch sides
Sets: 2 sets on each side for a total of 4 sets
2. Hip Hanging
- Lay over a bench and hang your hips off (support your weight with your elbows)
- Line your knees up with the edge of the bench and then lay over it so that your hips are resting on the edge. Your knees can dangle above the floor
- Use your elbows to keep your hips and spine decompressed. You can advance the stretch by pushing up on your elbows
Tip: This was the only position I could be in during the day for about 2 months. I used an ottoman (footrest) and worked from my couch for the majority of the day since I could only stand and walk using crutches initially
Hold Time: You can hold this stretch for as long as you feel comfortable
Reps: Repeat as needed to relieve tension
Sets: As many times as you need, listen to your body to see what helps
3. Swiss Ball Ab Activation – Trunk Stabilization/Strengthening: Supine
- Lay on your back with your legs bent and knees forming a 90 degree angle
- Push your lower back into the floor
- Use your hands to push a Swiss ball against your thighs while keeping your arms straight
- Focus on contracting your obliques and core muscles in the abdomen (the muscles on either sides of your abs)
Tip: This stretch focuses on strengthening the core in order to reduce tension in the lower back.
Hold Time: Hold for 5-6 seconds
Reps: Repeat 10 times and rest
Sets: Repeat for 3 sets (total of 30 times)
4. Swiss Ball Dead Bug – Trunk Stabilization/Strengthening: Supine
- Lay on your back with legs bent and push your lower back into floor
- Extend your left leg and right arm while pushing the Swiss ball into your right leg with your left arm
- Switch to the opposite side to push the ball against your opposite leg with the right arm while extending the right leg and left arm
- Focus on contracting the core muscles in the abdomen (on either side of the “six-pack”)
Tip: Similar to the previous stretch, this exercises helps with core stabilisation to relieve spinal tension.
Hold Time: Hold each side for 2-3 seconds
Reps: Repeat 10 times on each side and rest
Sets: Repeat for a total of 3 sets (30 reps total)
5. Double Knee To Chest – Low Back Flexion Mobilization/Stretch: Supine
- Lay flat on your back with your knees at a 90 degree angle
- Pull both knees up to your chest
Tip: This stretch helps to relieve pressure on the back of the spine thus relieving pain as well. It’s great for instant pain relief as it stretches out the lower back muscles like the erector spinae. Be cautious though, if it causes pain, stop immediately. You might want to begin with just one leg at a time to see how your back feels. This stretch does curve the spine a bit but doesn’t put pressure unless you pull your knees too hard. Focus on the lower back stretch to release the tension that squeezes your discs in the lower back.
Hold Time: Hold for 5-6 seconds
Reps: Repeat 10 times then rest
Sets: Repeat for a total of 3 sets (30 reps total)
6. Sciatic Nerve Mobility: Supine
The sciatic nerve originates in the lower back and extends down the leg to the toes. It is the largest nerve in the body which is probably why we’re always hearing about it. This stretch will cause some pain or sensitivity in the sciatic nerve and you will feel it as far down as your foot. Keeping this nerve mobile encourages healing so this is an important exercise as you seek to improve your condition.
- Lay on your back with your knees at a 90 degree angle.
- Gently pull one knee toward your chest until it is perpendicular to the floor. Straighten your leg as you stabilise it with your hands to keep it from falling.
- This is the important part: move your toes toward your body like you’re flexing your calf muscle.
Tip: You will feel a hamstring stretch and the nerve pulling through the back of the leg into the buttocks and lower back. If you can’t bring your leg perpendicular to the floor (straight up), try the movement as high as you can go and work your way up to it.
Hold Time: Hold your foot in flexion for 2-3 seconds
Reps: Do 10 reps on each side, then rest
Sets: Repeat for a total of 3 sets (30 reps per leg total)
7. Press-ups – Lumbar Extension Mobilisation/Stretch
- Lay on the floor face down
- Put your elbows under your shoulders
- Press up against the floor resting on your elbows and arching up (you can advance to pushing up on your hands as you build up flexibility)
- Keep your hips on the floor
Tip: This stretch releases tension in the lower back by stretching out the front of the spine and the core muscles. As you build up flexibility you will improve posture and relieve tension and pain in the lower back.
Hold Time: Hold the stretch for 5-6 seconds
Reps: Do 10 reps and rest
Sets: Repeat for a total of 3 sets (30 reps total)
8. Clams With Elastic Band – Hip Abduction & External Rotator Strengthening
- Lay on the floor on your side
- Bend your knees to 90 degrees
- Place a resistance band around the knees
- Place your arm or a pillow under your head
- Flex your core and lift the upper leg while keeping your feet together
- Lift your knee until your pelvis starts to move
Tip: Make sure you keep your core muscles flexed and active through the movement. This will help keep your pelvis in place.
Hold Time: Until your pelvis starts to move
Reps: Do 10 reps and rest
Sets: Repeat for a total of 3 sets (30 reps total)
9. Hip/Pelvic Alignment Exercise With Broomstick and Ball
- Lay flat on your back with your knees bent at a 90 degree angle
- Thread a broomstick, dowel or something sturdy under one leg and over the other
- Press the upper leg down and the press the lower leg up against the broomstick while holding it with both hands
- Hold the position for 10 seconds and then switch legs
- After repeating the exercise on the other leg, place a ball (basketball, soccer ball, etc.) between your legs and squeeze them together
Tip: You should hear a “pop” kind of like cracking a knuckle, your hips and pelvis are aligned. If you don’t hear a “pop” repeat the exercise until you do. This may take 2-3 repetitions on each leg. If you don’t hear the “pop” or feel movement in the pelvis after 2-3 repetitions, don’t continue, your hips may not be misaligned. This exercise helps to align your hips and pelvis which typically get misaligned when there is pain on one side of the body.
Hold Time: Hold the position for about 10 seconds on each leg
Reps: Until you feel/hear movement in the pelvis
Sets: Repeat up to 3 times on each leg
10. Decompression Hang
- Hold on to a pull-up bar that you can reach with both feet on the ground
- Alternatively, position two chairs (without rollers) on either side of yourself
- Pull up on the pull-up bar to reduce the weight on your spine
- Or push up on the chairs to reduce spinal weight
Tip: Don’t pull/push too hard if it causes pain. You only need to reduce compression on your spine to help your discs heal. Be cautious here because too much decompression too abruptly can cause a tear in the disc.
Hold Time: Hold for about 10 seconds
Reps: Repeat as needed
Sets: Repeat as many times as you can throughout the day
Chapter 5: Hit the Gym – Exercises for lower back pain
In the previous chapter we went through lower back stretches and exercises that will relieve tension on the lower back and strengthen you core to support your body properly. The following exercises are designed to eliminate the root of the problem. The issue is that you have pain and that is not acceptable. In this chapter we will help you eliminate the origin of the problem that led to the pain.
Something to keep in mind, as stated above, when you begin lifting weights focus on your form and do each repetition very slowly. This will give you a better, quicker response from your muscles. Lifting slowly will also keep you from going heavier than your joints and tendons can support, thus reducing injury.
As with anything else in this guide, stop immediately if you experience any pain. Don’t push through the pain in this case, that is your body telling you that it is being injured.
You can also train your body to have better posture and reduce risk of injury by using a posture corrector. I started using one during all of my lifts and I’ve seen a huge difference not only in how I look but how I feel as well.
It is highly recommended to either find a gym with a pool or use a community pool as this will help you recover more quickly.
Let’s begin!
1. Pull-downs
- Use a curved pull-down bar and either a wide to moderate grip
- Sit upright
- Pull the bar down to your chest evenly and slowly
- Slowly allow the bar to return to starting position
Reps: 10
Sets: 3
2. Seated Rows
- Keep both feet on the floor and sit up straight (don’t put your feet up on the footrest)
- Use the two separate handles
- Pull back toward your chest evenly and slowly
- Slowly allow the handles to return to starting position
Reps: 10
Sets: 3
3. Straight-Arm Push-downs
- Stand facing the cables
- Use the two separate handles
- Pull the handles down from shoulder height while keeping your arms straight
- Bring them all the way down to your sides while maintaining straight posture
- Slowly allow the handles to return to starting position
Reps: 10
Sets: 3
4. Seated Lower Back Extensions
- Sit upright on a Swiss ball
- Adjust a cable to the height of your chest
- Use a single handle
- Grab the handle with both hands and bring it a few inches from your chest
- Lock your arms in place and use your lower back to move your torso backwards to a 45 degree angle
- Slowly return to starting position
Reps: 10
Sets: 3
5. Pool Walking
- Stand in a pool in water just up to your chest
- Walk forward
- Walk backwards
- Side step
Reps: Walk for 10 min.
Sets: Each direction once
Bonus: Swim Workout for Lower Back Pain

It may be too soon to start swimming vigorously so take it easy if you have any back pain doing freestyle/crawl stroke. Initially you can do freestyle without kicking your legs. This should allow you to do some movement without affecting your back. As you heal, you can add breast stroke, backstroke and, ultimately, butterfly to the mix.
Swimming is a great, low-impact workout which will help your back to heal more quickly. The repetitive strokes will strengthen the back and help with good form and posture. As soon as you enter the water, the majority of your weight is lifted off of your spine because of the buoyancy of water. Floating in the pool is another great way to relieve pressure on the spine and allow it to heal more quickly.
Get in the water as much as you can.
Having said that, shoot for 5-days a week swimming but not less than 2. You should feel the effects and want to get back in the water as much as you can. I’ve been doing about 4-days a week.
I initially started with walking since swimming was too much for my back. After a few weeks I was able to start swimming without kicking too much, mainly just arms. Over about another month or so I was able to do all of the various strokes. Here’s the routine:
Weeks 1-2: Pool Walking (detailed above in 5. Pool Walking)
Weeks 3-4: Pool Walking & Light Freestyle (no kicking)
25 metres freestyle (just arms)
Rest
Walk back
Rest
Reps: Repeat 3 times
Sets: One
Weeks 5-6: Light Freestyle (minimal kicking)
50 metres freestyle with light kicking (no flip turns)
Rest
Reps: 3-5 (total of 150 – 250 metres total)
Sets: Complete once all the way through
Weeks 7-8: Freestyle & Breaststroke
50 metres freestyle (no flip turn yet)
Rest 1 min.
50 metres freestyle
Rest 1 min.
50 metres breaststroke
Rest 1 min.
50 metres breaststroke
Rest 1 min.
Reps: Repeat twice for a total of 400 metres
Weeks 9-10: Freestyle, Breaststroke, Backstroke
At week 10 you should be feeling pretty good! You can begin doing flip turns starting with week 9 and if you don’t have pain, continue. If you still feel pain when doing flip-turns, then don’t do them. You’ll have to listen to your body to see when you’re ready to flip-turn again if that’s something you want to do. It’s not necessary for your swimming workout.
50 metres freestyle
Rest 1 min.
50 metres freestyle
Rest 1 min.
50 metres breaststroke
Rest 1min.
50 metres breaststroke
Rest 1 min.
50 meters backstroke
Rest 1 min.
50 metres backstroke
Rest 1 min.
50 metres freestyle
Rest 1 min.
50 metres freestyle
Rest 1 min.
Reps: None
Sets: Complete the circuit once
Weeks 11+: Freestyle, Breaststroke, Backstroke, Butterfly
Start week 11 with the one minute rest and then reduce your rest time as you feel comfortable (meaning no lower back pain) to 30 seconds. This will give you more of a strength-building workout (HIIT or Interval Training style) and help you to feel great overall!
50m Freestyle
Rest
50m Freestyle
Rest
Reps: Repeat the cycle for Breaststroke, then Backstroke, then Butterfly and end with Freestyle again
Sets: Finish the entire circuit once for a total of 500 metres
At this point you should be feeling really good. It’s been 11 or more weeks in the pool and your back should be thanking you!
Chapter 6: No relapses – How to keep the pain away
As your body heals, your pain will naturally begin to reduce. I know it doesn’t seem like it will ever happen but, it does if you let it. Here’s how to allow your body to heal more quickly and get to a pain-free state.
Cleanse and Detoxification
Many of the foods we eat today are inflammatory and have multiple side effects. These can be masked behind our body’s ability to tolerate substances. Kind of like an alcoholic that can drink hard liquor without getting drunk contrasted with a person who has never had alcohol before getting drunk with their first drink. Your body has an amazing ability to tolerate and deal with substances, pain, etc. In order to heal however, your body’s immune system needs to be operating at optimum levels.
The best way to maximise your immune system and your body’s healing capability is by cleansing the system. In today’s world scientists have figured out that what we eat has a profound effect on our body. This happens through direct communication with the brain coming from our gut’s microbiome (https://www.frontiersin.org/articles/10.3389/fphys.2011.00094/full). We need to get the microbiome balanced and healthy in order to heal more quickly and get the rest of the body happy. Think of it as a rainforest jungle in your stomach full of flora and fauna. If you’ve been taking antibiotics, you basically have been using diesel-powered tractors to clear that rainforest. Now we’re going to replant and re-grow your microbiome.
Here are the basics:
Do Eat
- A lot of water (about 3% of your bodyweight in litres)
- An Avocado before your meal at least once/day
- 2 Tablespoons of Apple Cider Vinegar (with the mother) before every meal
- Greens & Vegetables (any and all vegetables with the exception of Soy, Potatoes, Tomatoes): 75% of each meal
- Fresh fruits: blueberries, strawberries, blackberries, lemon, banana, apple 1-2 servings per day
- Fish, Chicken, Turkey, Lamb (no shellfish)
- Seeds and nuts (except peanuts)
- Almond & Cashew butters
- Almond & Coconut milk (unsweetened)
- Olive, Avocado, Coconut oils
- Stevia, Xylitol, Erythritol
Don’t Eat
- Any foods you’re allergic to
- Dairy (milk, yogurt, butter, cheese)
- Eggs
- Margarine & Shortening
- Gluten
- Any grains (including rice, corn, quinoa)
- Tomatoes & tomato sauces
- Potatoes
- Peanuts & Peanut Butter
- Soy & any soy products
- Honey, Agave, Artificial Sweeteners
- Beef, Pork, Canned meat, shellfish
- Alchohol
- Caffeine
- Fruit Juice
- Preservatives, colouring, additives
No snacking between meals
Do an intermittent fast (mainly men, women have varied results due to hormones) – skip breakfast daily
Try to get all of your food organic
The less processed, the better
Do this for 6 weeks. At that point your immune system will be optimised and you will be sensitive to foods that you shouldn’t eat. You can keep going indefinitely as long as you want to keep your microbiome optimised.
You might only want to add back a couple of foods (like eggs and tomatoes).
Start adding foods back in (like eggs, tomatoes, etc.) one at a time for 3 days to see if there are any effects. If nothing is noted (usually itchy throat, asthma, brain fog, bloating, loose stool) then remove it again and add the next food. If nothing is noted with the next food, add them both together to see if there’s any effect. If there is no reaction after 3 days, remove both foods and start again with another food until you’ve added back all foods that you’re interested in eating.
Some foods that should be discontinued indefinitely are: anything containing gluten, dairy (cow products), sugars
Posture
Keep your back straight and shoulders back and down. This will help keep your head over your hips in your body’s natural centre of gravity. If you need help remembering (very common), then you can use a posture corrector.
Interestingly, I started using a posture corrector just to give it a try and my lower back pain was reduced immediately. I wear mine as much as I can in public and private.
Walking
The Gokhale method has some great insights on walking properly (https://gokhalemethod.com/blog/62310). Here are some fundamentals:
Turn feet slightly out
Hold your head as if you were carrying a weight on it (push up against the weight)
Keep your heel on the ground as long as you can before lifting
Activate the core (muscles under the ribs and on the sides of your “six-pack”) to maintain your hips in alignment
Focus on activating the glutes with each step pushing back with the heel
Don’t overuse the quads when walking, allow the leg to swing back forward naturally to take the next step
Standing
Turn your feet out slightly
Focus on keeping an arch in your feet
Glutes are slightly activated
Push up against an invisible weight with your head
Keep the shoulders back and down
Activate the core (muscles under the ribs and on the sides of your “six-pack”)
Maintain your centre of gravity (head over hips)
Sitting
You might not be able to sit yet. I couldn’t for about 2 months. I’ve looked for different chairs like the Danish kneeling chair, a chair-massage chair and others but they put pressure on different parts of the body. The best solution is to use the Gokhale Method stretch sit cushion with a chair that has a firm back. I use this in the car and on my office chair and it allows my back to decompress while sitting.
Push your back into the stretch-sit cushion
Allow your lower back to hang freely
Keep your feet firm on the ground
Activate the core
Keep the back tall
Shoulders back and down
Push head against an invisible weight
Don’t let the back roll or curve, use your core muscles to maintain posture
Stand up and walk every 15 minutes or so
Breathing
Your body needs oxygen to heal (https://www.sciencedirect.com/science/article/abs/pii/0002961069901743). Healing could be limited by oxygen supply so let’s remove that factor.
Focus on breathing deeply for about 1 minute every hour.
It’s also helpful to do this when lying in bed to sleep. The deep breaths not only increase the oxygen supply but, using your diaphragm, they also allow your spinal muscles to stretch and lengthen giving you a decompression with each breath.
Breath in as deep as you can through the nose
Let all of the air out through the mouth
Take about 10 deep breaths
You will feel energised and tingly afterwards because of the heightened amount of oxygen in the red blood cells.
Chapter 7: Advanced lower back treatment
Advanced in the sense that the pain has advanced further than what can typically be cured at home and you need some additional help.
Here’s what has worked for me to where I’m walking and sitting normally at a desk and exercising in the gym after 2 months of treatment:
Bemer Pro
This is a form of PEMF – Pulsed Electro Magnetic Frequency treatment which is designed and built in Lichtenstein (tiny country between Switzerland and Austria). It has clinical trials and is used in hospitals, olympics and sports teams throughout the world for over 30 years.
Why it works:
The spine has reduced blood flow compared to other areas of the body. In order to heal, you need to get blood flowing to the area to bring new cells and building blocks and move the broken down ones and toxins out of there. The Bemer Pro opens up the capillaries and gets the blood flowing like Nascar in a magnetic line instead of a jumbled mess.
I thought this was pseudoscience at first but then had the opportunity to use it for a week at home and after 3 days I was standing up once again (previously I was stuck laying on the floor for weeks).
Check it out here: Bemer Pro Set Complete With Warranty
Chiropractic & Spinal Decompression

Spinal manipulation is and adjustment of the vertebrae to help them align properly. Spinal decompression is where you’re spine is being pulled apart enough to relieve pressure on the discs.
Why it works:
You have pain because your vertebrae are stepping on the disc and squeezing it out. Decompressing the vertebrae allows the discs to expand once again to a more normal state where it can begin the healing process. An adjustment or manipulation allows the discs to be put back into the correct place by moving the vertebrae to their proper position.
This relieved my pain almost instantly and reduced the numbness in my foot while I was being pulled. After 53 sessions I’ve noticed that decompression without the adjustment doesn’t have the same pain-relieving affect.
I used a spinal decompression belt on a daily basis for about a month. Then I transitioned to just using when I was on my feet. After that I used it whenever I had to carry anything (camera, light bag or lunchbox, etc.). I’ve had friends and family purchase other ones to try them out but they exploded or didn’t work properly.
Here’s the one that I used (I got the silver one): Decompression Back Belt
Acupuncture

This was my first time trying acupuncture. I wasn’t really sure what to expect as I was sitting in the waiting room…
How big were the needles?
Why did they need to stick needles in me?
How deep do they go?
Do they try to stimulate the deep muscle fibres?
Fortunately the provider was very friendly and told me that he uses brand-new sterile needles and that they’re very fine.
As he put them in he taps them, they literally felt like “ant bites” (except that they don’t itch afterwards). If there is a burning sensation then he removes it immediately because that means it went into a hair follicle. The needles are only skin-deep and they stimulate the nerves to provide a release in tension and increase blood-flow to the areas needing to heal.
The redness is the response you’re looking for as you increase blood flow to the target area.
There is also a Chinese medicine aspect of acupuncture that uses opposing nerves and pressure points to stimulate healing.
After the treatment I didn’t really notice any difference until I remembered that prior to treatment I was in pain and now I wasn’t. This effect lasted a few days but combined with the other treatments I felt like it helped a lot.
Physical Therapy
Strengthening the stabilizing muscles and the areas that allowed the injury in the first place.
Why it works:
In treating the underlying issue, we have muscles that have been forgotten or, due to laziness, unused in our daily lives. Physical therapy seeks to strengthen those muscles and help you to become more conscious of how you stabilize yourself and stand and walk, etc.
Although my MRI showed my core muscles to be huge after years of compound weight lifting, the therapists insisted that I needed to strengthen my core. Being in a desperate situation, I did whatever they said and thankfully I’m able to control the pain with the exercises they gave me (see chapter 5).
Gokhale Method
Relearning our daily, basic movements to reflect the pain-free lives of our ancestors or other “less-developed” civilizations.
Why it works:
Our current posture and movements are learned from generations of poor posture which has been further degenerated by fashion and modern beauty standards. Learning to move the way our ancestors did allows us to live pain free lives the way they did.
After reading her book and seeing some results, I bought the Stretch-Sit cushion and use it in the car and on my chair. This allows me to do spinal decompression, to a certain extent, anytime I’m sitting.
Here’s the book: Esther Gokhale: 8 Steps to a Pain-Free Back
Here’s the Stretch-Sit Cushion: Gokhale Method Stretch-Sit Cushion Lumbar Support
Posture Corrector
Teaches you correct posture by giving you a reminder of where your baseline should be.
Why it works:
Although we’re conscious of posture we aren’t really remembering it in every minute. The posture corrector tugs at your shoulders as you start to let them drift forward. Keeping our shoulders back moves our head and neck back over our spine and centered over our pelvis which reduces pressure on the discs in the spine.
I got this on Amazon to try it out and noticed an immediate difference. After putting it on in the morning before doing my Physical Therapy exercises, I noticed that I hadn’t felt any pain or symptoms without doing any other treatment. I usually do my exercises in the morning to get myself pain free and moving better. Although I now have some soreness in my upper back from pulling my shoulders back, it is due to engaging muscles that have long been left unused and will strengthen and train in time to keep my shoulders back naturally.
This is probably the best money I have ever spent. At the point I am at now, where I’m back to moving naturally without pain, I would completely recommend this. Desk jobs especially.
Here’s the one that I got: Posture Corrector For Men And Women FDA Aprroved
Orthotics and Insoles
Since I was willing to try anything to get the pain to subside, I also got some insoles at my local sporting goods store.
The first two weeks with insoles was not very comfortable but the first time I put them on I noticed an immediate difference. A good difference. After about two weeks of using them off and on my feet were used to them and I felt like I could maintain proper foot posture without needing to use insoles constantly.
My recommendation is to use insoles to build your foot’s natural posture which will help your overall posture (including your back). After you’ve trained your feet, maybe just use the insoles every so often to keep them trained.
The easiest way is to just put them in your shoes on top of the current insole. If your feet are too crammed, you may have to rip out the original insole and replace it with this one. You can either get multiple for each pair shoes you’ll use them with or constantly switch them from pair to pair.
Here are the ones I use: Superfeet GREEN Insoles
I’ve used them in my Sperry’s with great results.
Hang in there! Lower Back Surgery vs Healing Naturally
I know it’s rough. It seems like you’ll be this way for the rest of your life. But with these lower back stretches, exercises, advancedand alternative care treatments, you should be starting to see some good progress. The impatient route is surgery.
Studies have found that the risk isn’t worth the reward: those who had back surgery didn’t improve more than those who treated lower back pain with exercise (https://ard.bmj.com/content/annrheumdis/69/9/1643.full.pdf).
Make sure that if you are considering a surgery, you see multiple specialists and get an MRI to see the whole picture. Discs can heal. It might take 6 months to 2 years to completely heal but a lot of surgeries go back for second procedures so keep that in mind.
